The Top 5 Accessibility Roadblocks for Visually Impaired E-Learners
A few years ago I surveyed learners on elearning accessibility, and there was one response that will stick with me the rest of my career.
The employee wrote on behalf of her coworker who was visually impaired and told us how she spent hours assisting her coworker to complete required elearning modules.
Apparently, this particular series of modules had text that was far too small, no alt text, and the interaction layouts were way too busy.
She detailed how our visually impaired learner was absolutely adamant about completing the training.
Even if she needed someone to read every screen to her.
Even if it took hours longer than everyone else.
That shook me. I had poured so much energy into coming up with new and exciting ways to engage uninterested learners. And now I had evidence of motivated learners being left out due to fundamental accessibility being put on the backburner.
I may not have designed the modules in question, but I knew I easily could have, and that knowledge made me feel guilty.
Elearning can only be a force for equity and inclusion when the humans behind the design refuse to compromise on accessibility. So here are 5 best practices to create accessible elearning for learners with visual impairments.
Clear and Simple Language
Any language used in a course should be as plain as possible so it’s easy to read and understand. I focus on length, vocabulary, and overall structure.
Let’s look at an example…
Original: “The individuals who have been affected by the natural disaster will need to evacuate the area immediately.”
Simplified: "If there's a natural disaster, people should leave right away to stay safe."
The original is a fairly long sentence with multiple clauses, so it’s a little harder to parse the meaning. It contains more advanced vocabulary that doesn’t provide more clarity. “Individuals/evacuate” aren’t more specific than “people/leave”, but they are more complex words to read. Lastly, we have a complex structure using a subordinate clause (“who have been affected by the natural disaster”) nested within the main clause (“The individuals… will need to evacuate the area immediately”).
The Bar Test
A quick way to check your writing is using the “Bar Test.”
Simply imagine saying what you wrote to someone at a bar or coffee shop. If they would look at you funny or ask why you’re talking weird, you should rephrase the sentence.
Alternative Image Text
This is an easy one. All images should have alt text to describe the content of the image. This allows learners with screen readers to understand the context.
Keep in mind that the alt text should be descriptive so a learner with a visual impairment can actually get the context of the image.
Bad alt text: “Image of a man”
Good alt text: “Image of a man holding a white cane and crossing a street”
Also, we need to make sure the alternative text does not include opinions, assumptions, or additional information not specifically shown in the image. This will help avoid biased interpretations of the image that could interfere with the learner’s understanding.
Proper Color Contrast
Most elearning designs seem to get this one right (perhaps because it’s important even for folks who don’t have visual impairments). Put simply, we need high contrast between text/assets and the background.
Example:
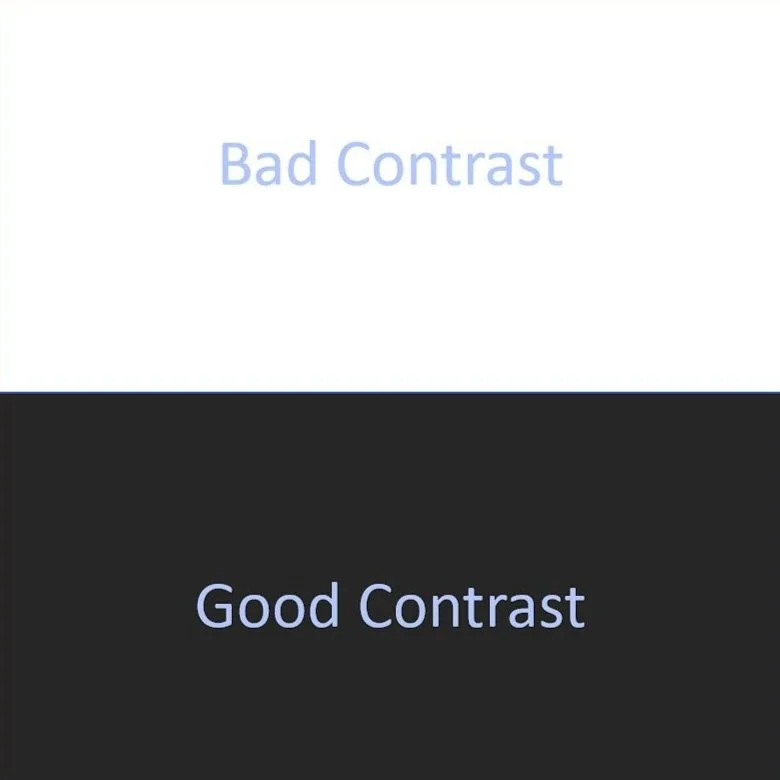
The Web Content Accessibility Guidelines (WCAG) recommend a minimum contrast ratio of 4.5:1 for normal text and 3:1 for large text.
If you’re unsure about your design, you can quickly check your contrast with the WebAIM Contrast Checker by entering the hexcodes.
Descriptive Headings
Descriptive headings and subheadings help organize the content in a way that learners with screen readers can easily navigate.
The operative word here, once again, being descriptive. Generic headings lead to confusion and trouble differentiating between sections.
Example:
Bad heading: “Chapter 2’
Good heading: “Chapter 2: A Brief History of Instructional Design”
Audio Descriptions
Audio descriptions describe the content of visuals appearing on screen. They are one of the trickier accommodations, but for the people relying on them, they’re absolutely essential. Full stop.
Best Practices:
Descriptive and Concise — Similar to alt text, audio descriptions should clearly convey all the context of the visuals without including opinions or assumptions.
Consistent Terminology — As much as we like to use 50 different words to describe the same thing in this field, resist that urge here. Use the same terms to describe visual elements throughout the elearning so learners can make connections between different pieces of content.
Clear and Simple Language — Apply the Bar Test!
Separate the audio tracks — I use entirely separate audio tracks and narrators for audio descriptions. This helps learners distinguish between audio descriptions and the course audio. The same narrator can be used if they use a high energy voice for the main audio and a more neutral tone for the audio descriptions.
Provide audio in the pauses — Look for the natural breaks in narration and course audio to include the audio descriptions. It’s ok if the audio comes a bit before or after the visual if that’s what it takes to avoid overlapping with the main audio.
Wrapping Up
I don’t think anyone would disagree with the idea that it’s important for instructional designers and developers to take accessibility seriously. Frankly, it’s the primary lever we have in our field to build toward a more inclusive future.
What’s more, implementing these best practices will guarantee better engagement across your learner population. I know it’s not sexy, but principles that stand the test of time rarely are.
And with that, I’ll leave you with what a colleague once told me –
“Accessibility is an opportunity, not just an obligation.”